
Salesforce’s Flow HTTP Callout is a powerful tool that allows you to easily connect external web services and retrieve or alter data from remote systems within your Flow. This allows you to incorporate external systems and APIs into your automated processes, enhancing Salesforce’s capabilities and optimising procedures.
While configuring API connection in HTTP Callout, we provide a response sample JSON to create response classes and structure. Now we can also test the configured HTTP Callout connection and get the sample response while we configure HTTP Callout. We have the feature Connect for Schema in HTTP Callout to test and get the response from the configured external system. This post will provide step-by-step information to use the Connect for Schema feature in the HTTP Callout flow.
Steps to verify Flow HTTP Callout Connection
In this post, we will create a connection with the JIRA REST API. This API will require Basic Authentication. We will create basic authentication parameters in the named principal and add authorization parameters in the external credentials. This generated authentication token is added to each request using the named credential headers setting.
The below steps will be involved to verify the HTTP Callout connection.
- Create an External Credential
- Create a Named Principal
- Create a Permission Set
- Create a Named Credential
- Update External Credential Basic authentication
- Create HTTP Callout Action and Test Endpoint Connection
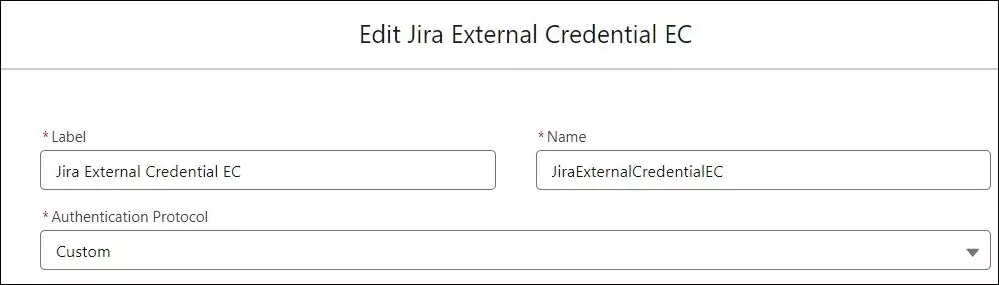
1. Create an External Credential
Create an External Credential for JIRA API Integration. External Credentials will be used to store authentication information for JIRA.
Create an external credential named Jira External Credential EC (JiraExternalCredentialEC) that will support custom authentication
2. Create a Named Principal
We will need a named principal that applies authentication configuration to the named credential. Create a named principal with the name Jira Principal.
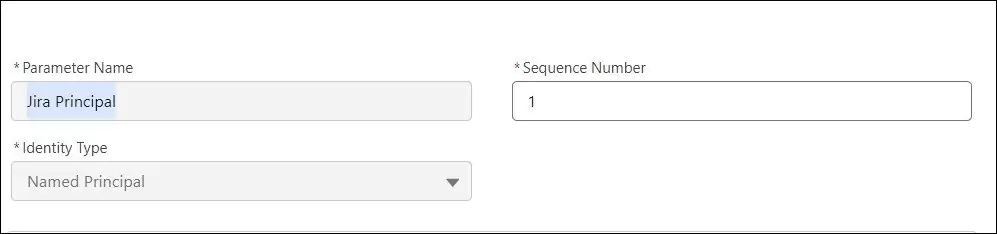
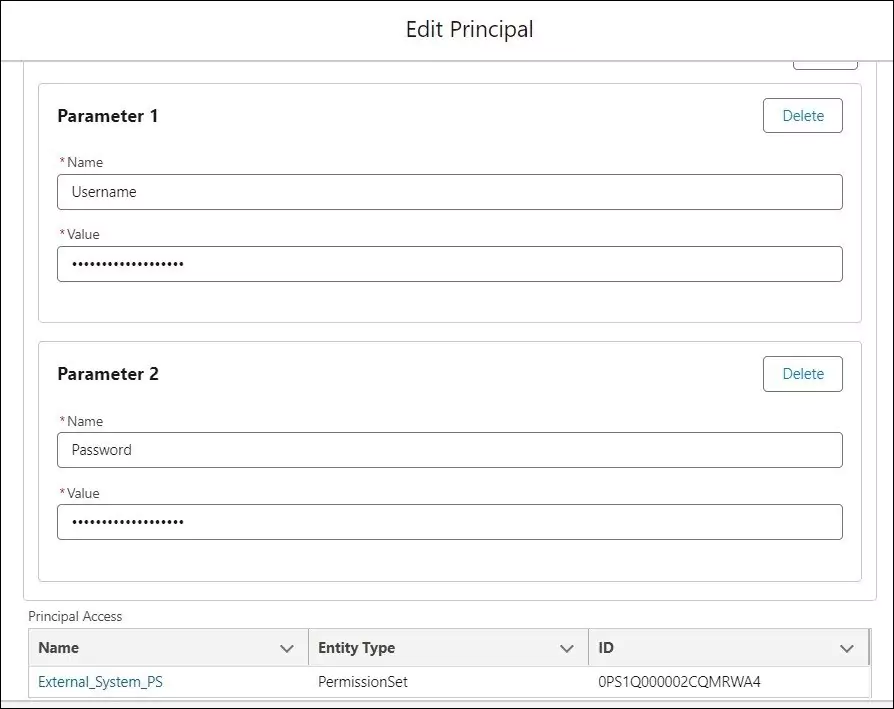
As we need to connect JIRA REST API. This API needs Basic authentication to retrieve Jira project issues. We need to add two parameters in Named Principal.
| Parameter Name | Parameter Name |
|---|---|
| Username | <Jira Username> |
| Password | <Jira API Token> |
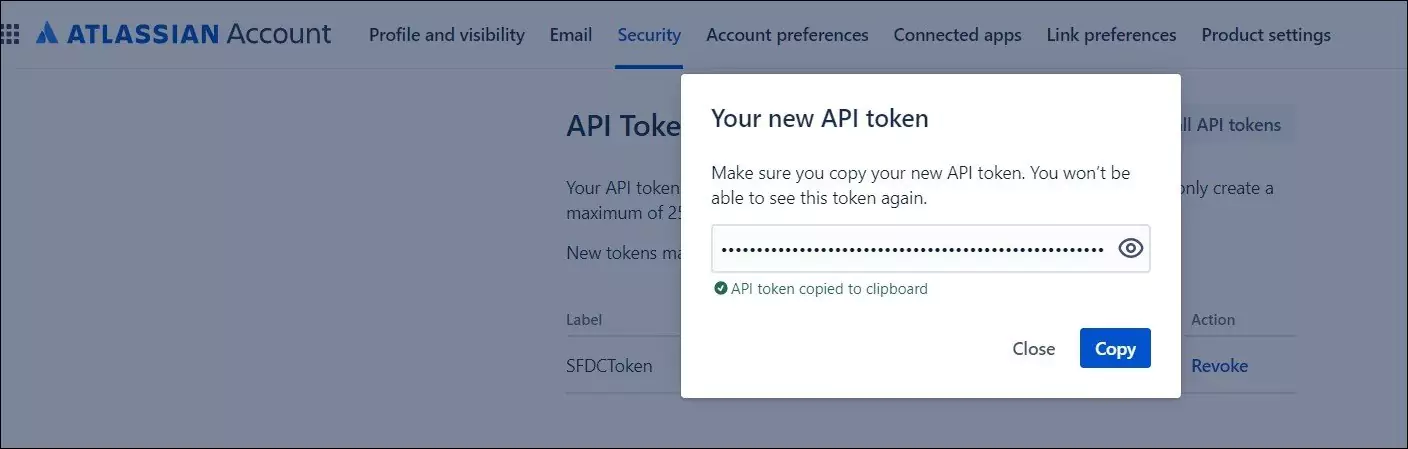
Jira API token can be generated from https://id.atlassian.com/manage-profile/security/api-tokens for your JIRA project.
3. Create a Permission Set
Create a permission set to provide user access to this external credential. Create a permission set External System PS and assign the above-created external credential Jira External Credential EC in External Credential Principal Access. Once a permission set is created, assign this permission set to the required user. For this POC, I have added a permission set to myself.
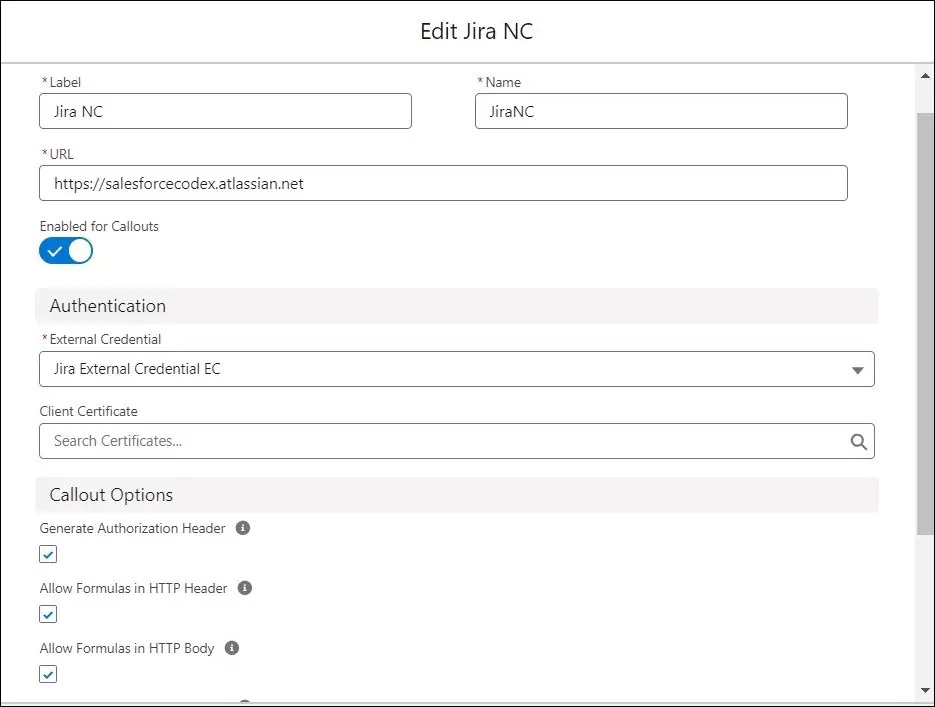
4. Create Named Credential
Create a named credential with the name Jira NC (JiraNC) and the below properties.
| URL | https://salesforcecodex.atlassian.net |
| Allow Callout | checked |
| External Credential | Above created External Credential Jira External Credential EC |
| Generate Authorization Header | Checked |
| Allow Formulas in HTTP Header | Checked |
| Allow Formulas in HTTP Body Help | Checked |
5. Update External Credential Basic authentication
Once parameters are created in the named principal, we can use these parameters to generate an authentication token. We need to create a custom header Authorization in this external credential.
Value for external header will be – {!’Basic ‘ & BASE64ENCODE(BLOB($Credential.JiraExternalCredentialEC.Username & ‘:’ & $Credential.JiraExternalCredentialEC.Password))}
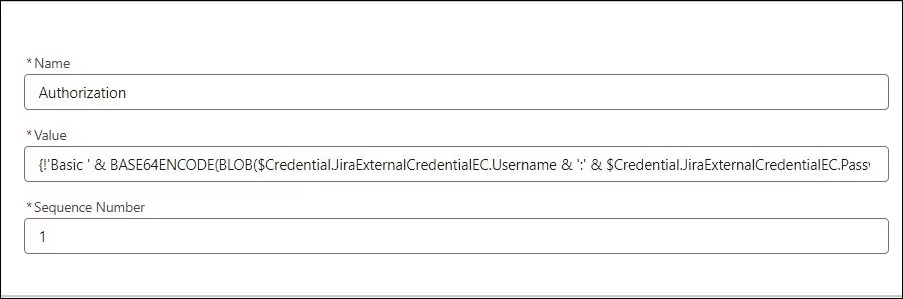
JiraExternalCredentialEC is the external credential name and Username and Password are named principal parameters. So if you have added different names for these parameters then put names accordingly.
6. Create HTTP Callout Action and Test Endpoint Connection
Let us create an HTTP Callout action to connect JIRA. Create a screen flow and add an Action element on the screen. On the action page select HTTP Callout action to start External Service creation.
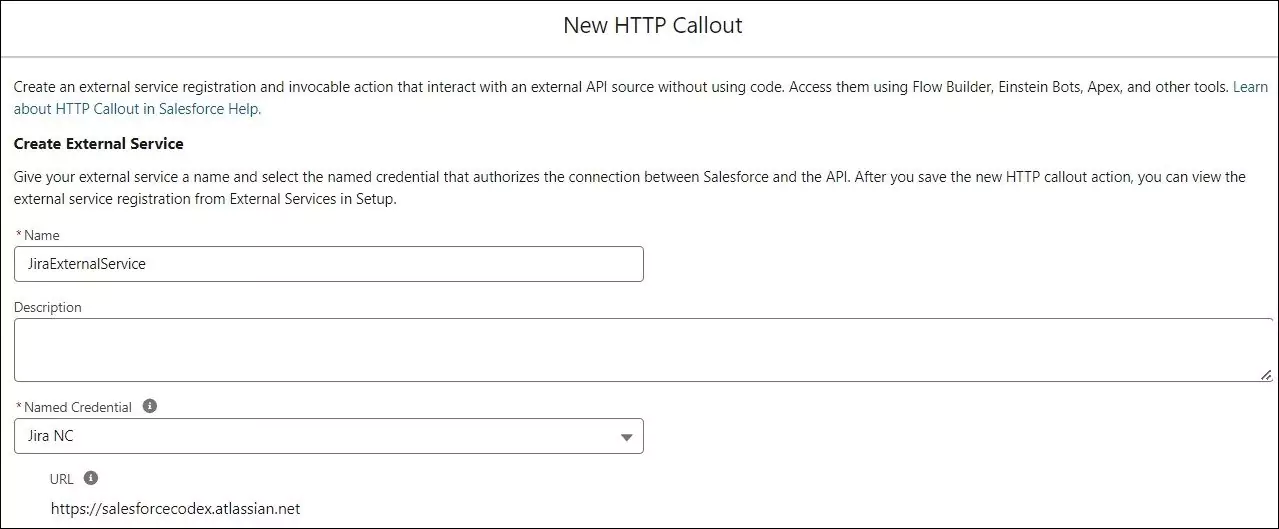
We need to call the JIRA Issue API https://salesforcecodex.atlassian.net/rest/api/3/issue/10002 to get an issue created for any project. Once an external service is created, we need to create an invocable action to execute this API. Create a GET action to retrieve issue details.
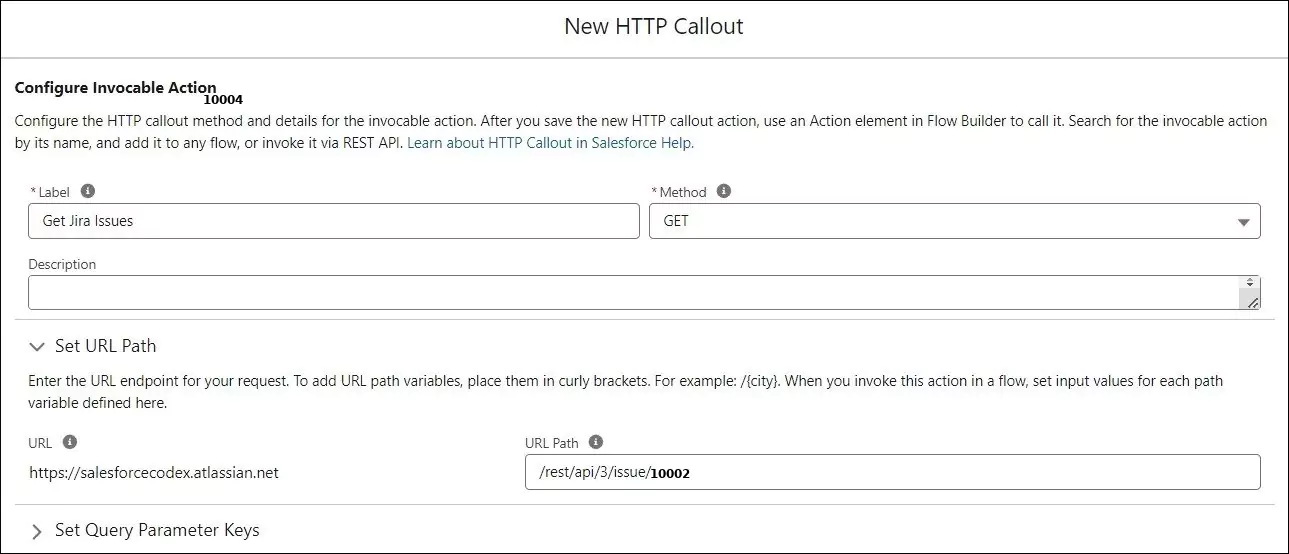
After invocable action is created, we will be redirected to the response generation/consumption page to create response classes.
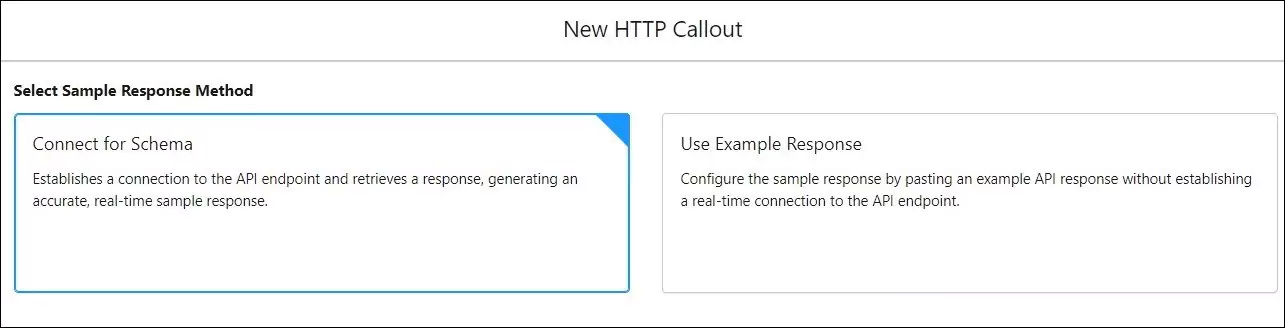
Select Connect for Schema to generate the response based on the URL. This will be only available for GET invocable action. If correct authentication is provided and the URL is correct then it will generate a proper response. This way we can test URLs while HTTP Callout configuration.
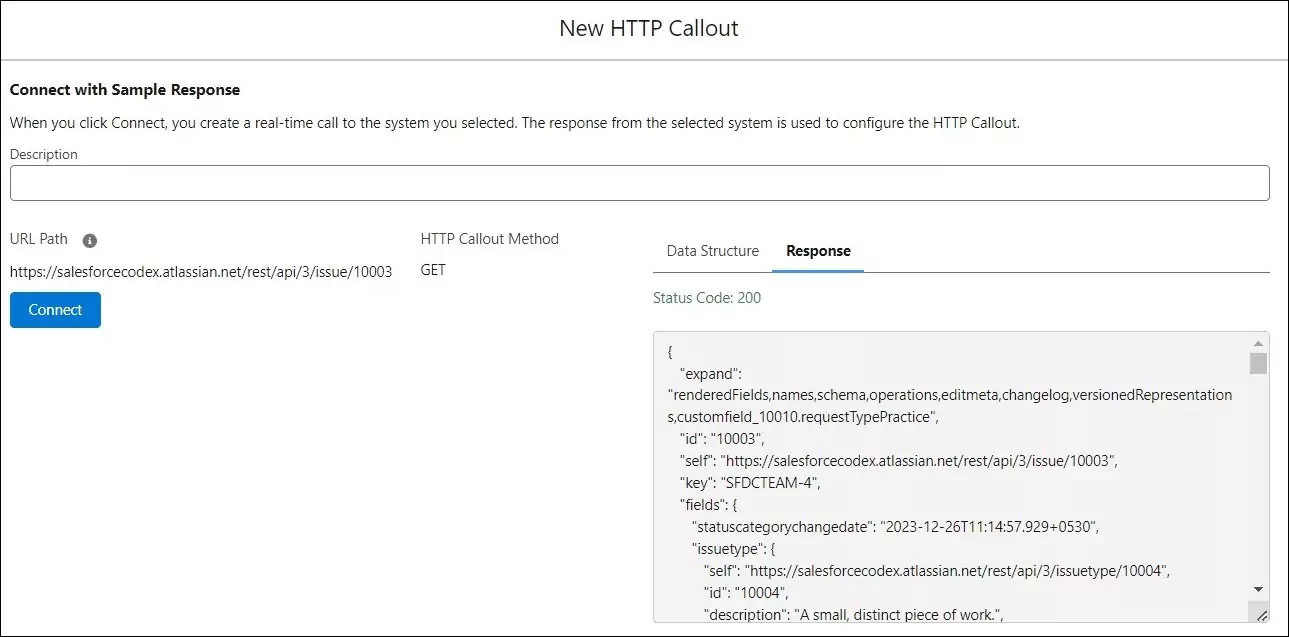
After the response is generated Save this action to use in Flow.
References
Verify Your API Connection via HTTP Callout
Related Posts
Searching Text in Flow Data Table
Getting the current Record in Salesforce Flow
Show User Record Access Using Flow